

Not everyone can record podcasts in person with their co-host or guests. Sure, being in the same studio is perfect for interaction, but many have to rely on remote communication.
Thankfully, with the rise of podcasting online, there are now numerous services available to address this. In this post, we’ll explore how to do a podcast with someone far away, present various services, cover the basics, and offer helpful tips.
Remote Podcast Recording Essentials
The right gear
To achieve high-quality sound, you don’t need to break the bank. Start with a podcast microphone with a cardioid pickup pattern to minimize background noise. There are two main types:
- USB microphones — Great for beginners as they don’t require additional equipment. Examples include the Audio-Technica ATR2100x-USB or the Blue Yeti.
- XLR microphones — Offer superior sound quality but need an audio interface. The Shure SM7B is a popular choice.
Don’t forget about headphones! Opt for comfortable closed-back headphones like the Sony MDR-7506 to monitor audio quality and prevent echo. Some podcasters also use a pop filter to eliminate popping noises from letters like P and B.
Ensure a stable and fast internet connection for uninterrupted recording. It’s also wise to record on your computer as a backup in case of internet issues (more on the topic later).
Recording software
Consider tools like Waveroom, Riverside, Zencastr, Cleanfeed, Squadcast, Zoom, or Discord. Below we’ll provide more information on how to use these tools and achieve studio-quality recordings comparable to professionally produced podcasts.
Recording space
A well-treated recording space does a lot for your audio quality. Follow these tips for more enjoyable and professional episodes:
- Choose the quietest time and place for recording.
- Use soft furnishings like carpets, curtains, and cushions to absorb sound.
- Turn off or silence devices like fans, air conditioners, and phones.
- Position the microphone correctly, about a fist’s distance away from the mouth.
- Have a sound check before each recording session to adjust levels and ensure clarity.
Preparation
If you’ll be hosting guests on your podcast, provide them with the necessary information beforehand. Not all guests may be familiar with remote podcast recording. Communicate the podcast format, episode length, main segments, and any speaking guidelines.
Now, let’s record!
How to Record a Podcast Remotely: Specialized Software
Waveroom
Choosing a specialized platform designed for podcast and interview recordings often leads to better outcomes. Waveroom, powered by AI and completely free, is one such platform worth considering.
Here’s how to record a podcast remotely for free with Waveroom:
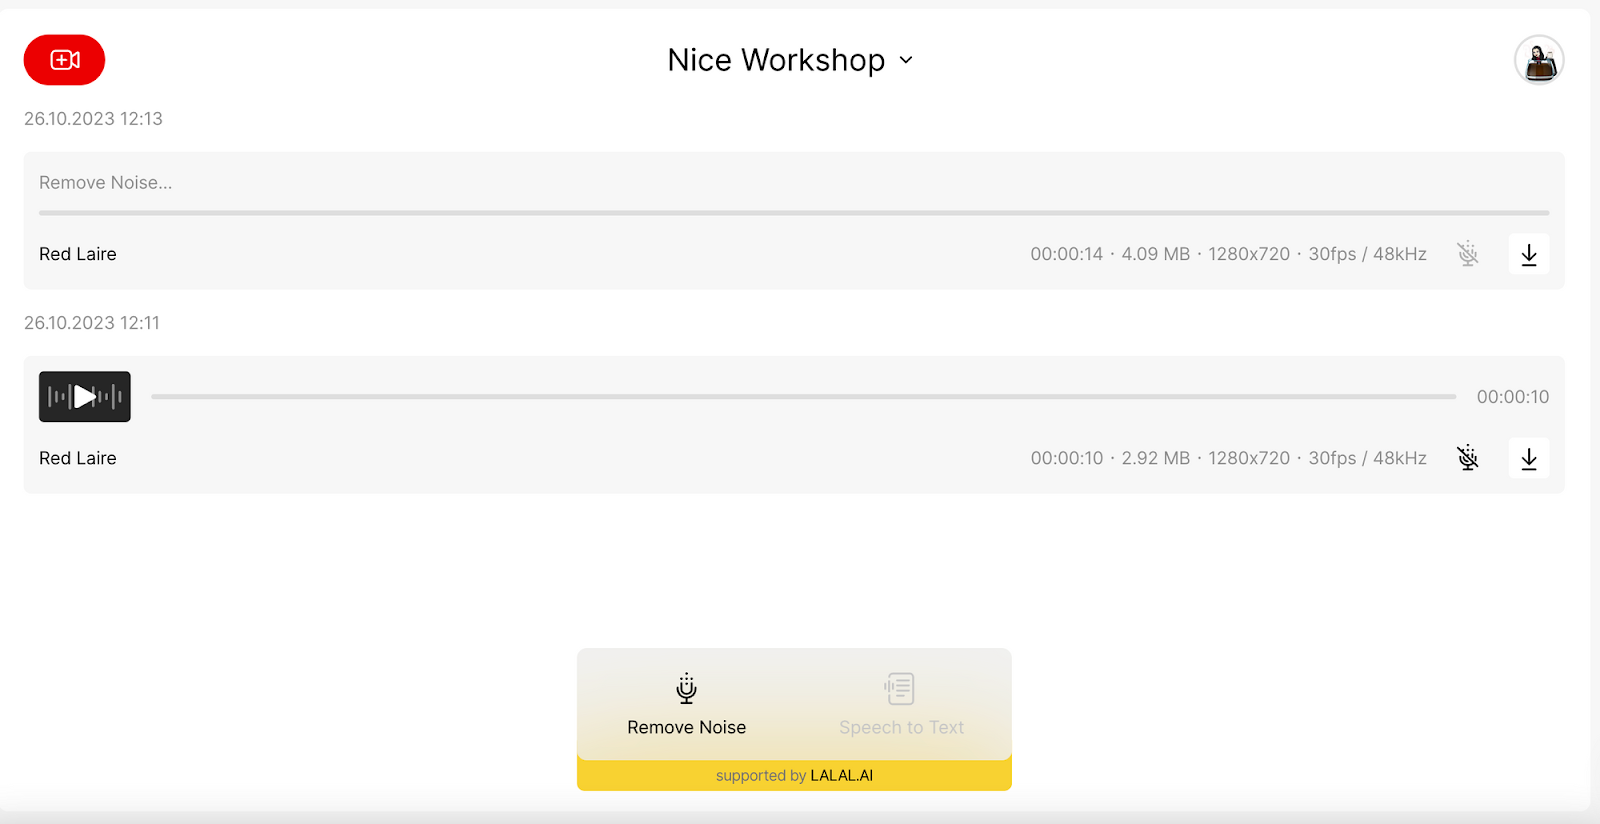
- Sign in to your Waveroom account.
- Create a room with a unique name for easy access.
- Customize your video, audio, and recording settings according to your preferences.
- Test your setup by clicking Go to Test Record or start recording immediately by clicking Start Meeting.
- Once you’re finished recording, click Stop Recording. Your recordings will be automatically saved in the room.
- Reduce any background noise from your recordings with the Remove Noise feature.
- Export your recordings using the downward arrow icon.
Riverside
Another widely used tool for recording podcasts with remote guests is Riverside. However, unlike the previous option, Riverside isn’t entirely free. While it does offer a Free plan, it comes with limitations, such as watermarked files and a maximum recording time of two hours. For more extensive use, there’s a Pro Plan available for $24 per month (up to 15 hours of video/audio).
To use Riverside for your podcast recordings, follow these steps:
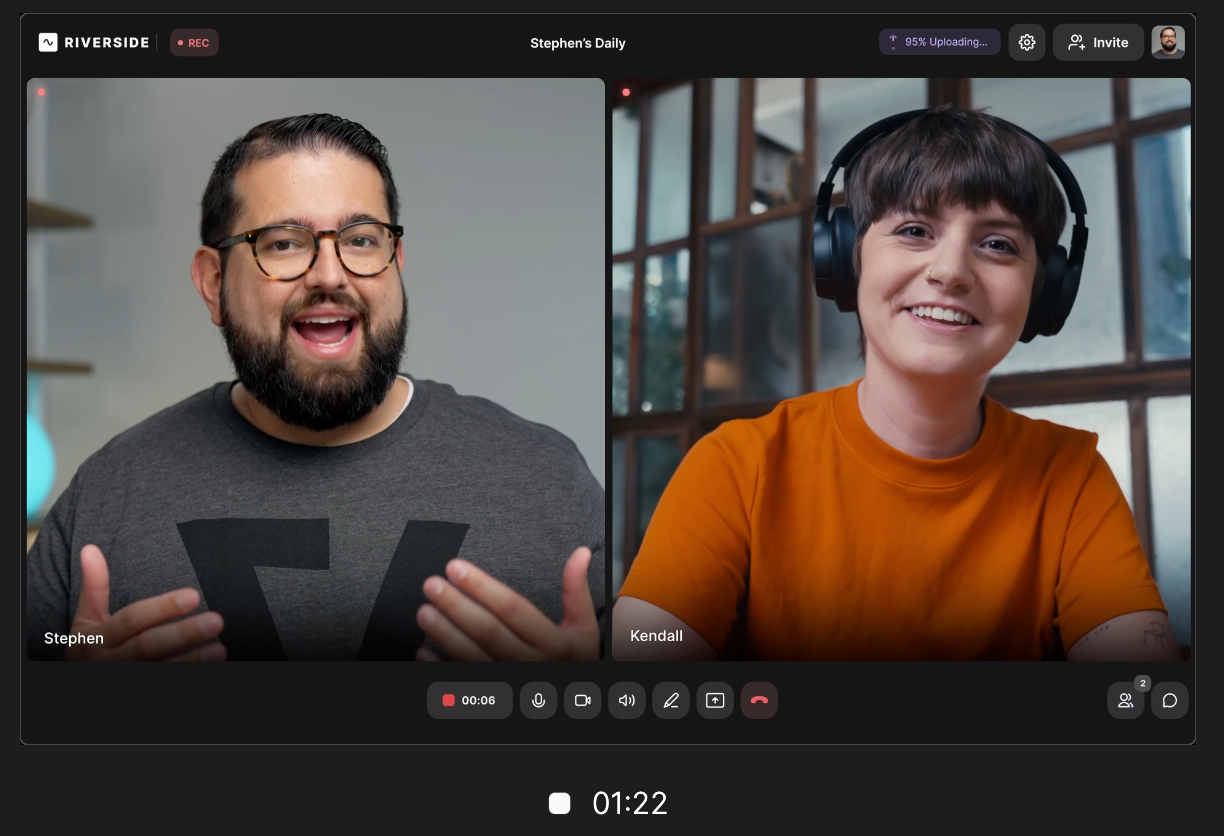
- Access your Riverside Dashboard and create a new studio.
- Share the invite link with your guests.
- Enter the recording studio with your guests and start the recording session.
- When you’re finished recording, stop the session and wait for all files to upload.
- Download separate audio and video tracks for each guest, or use Riverside’s AI-enhanced editor to refine your recording before exporting it.
Other Options
For more options, here’s a breakdown of podcast recording platforms and their pricing plans:
- Zencastr has a free plan through its Creator Network and various paid plans with different features.
- Cleanfeed has a free option with basic features, or you can upgrade to Pro for $34/month, which includes separate track recording.
- Squadcast also has a free tier with one hour of recordings per month, or you can opt for their $15/month plan for 10 hours of recording.
How to Do a Podcast Remotely: Video Conferencing Software
Zoom
When it comes to video conferencing, let’s begin with one of the giants: Zoom.
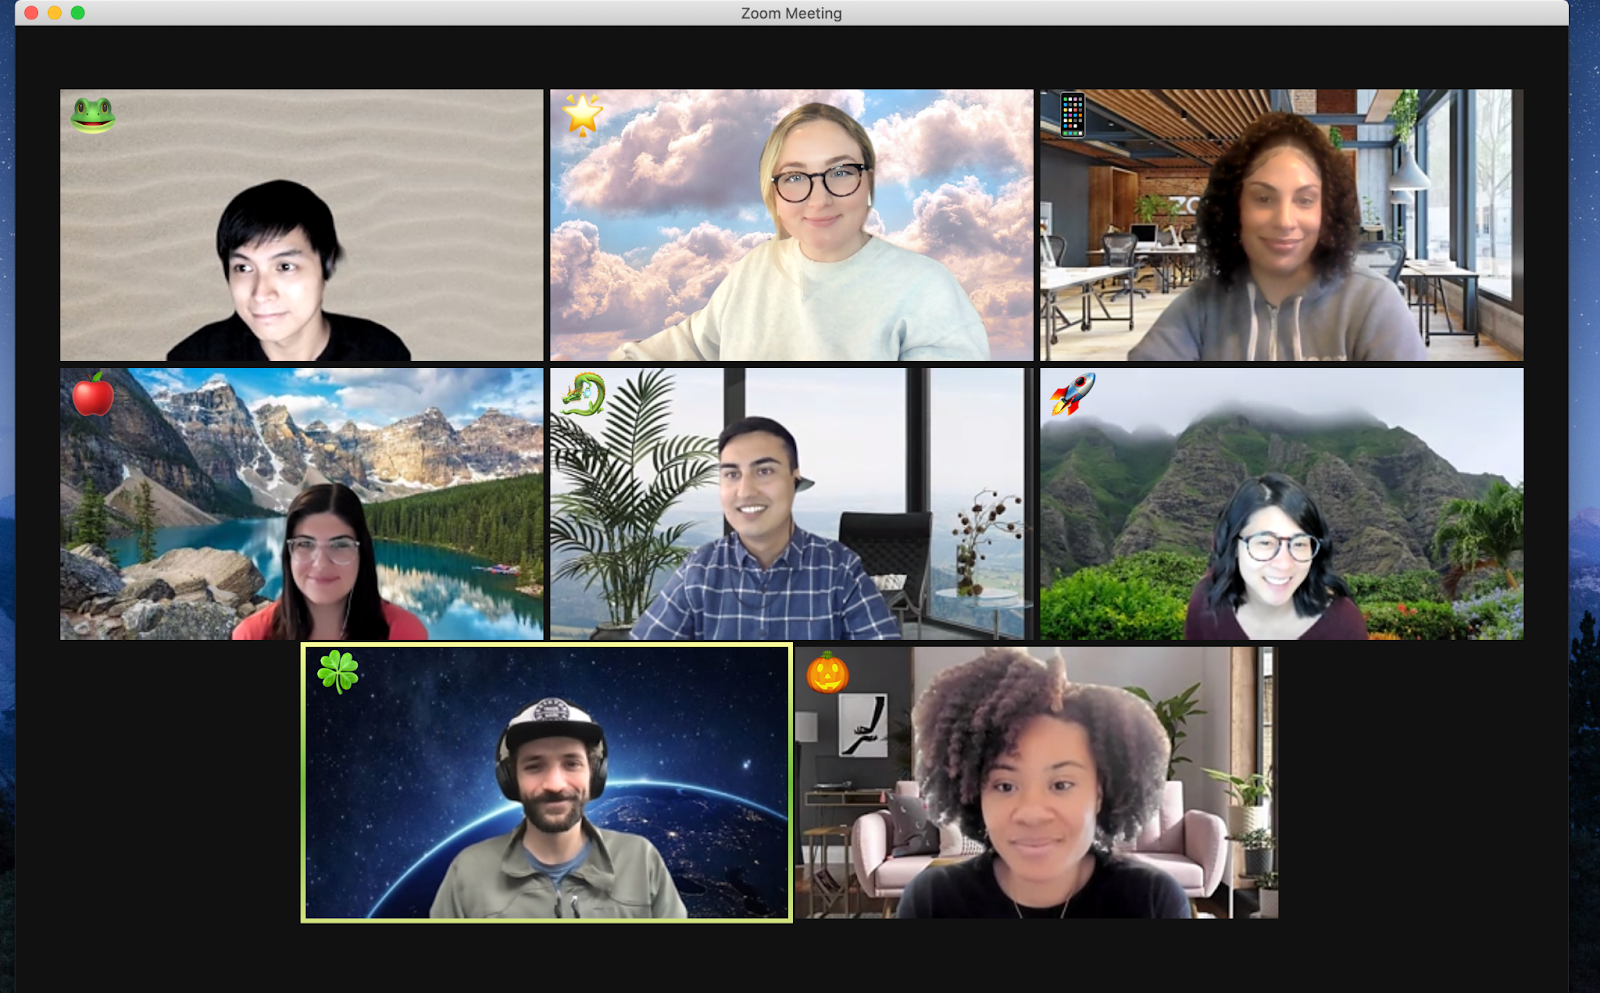
- Download Zoom and create an account if you haven't already. If you’re already signed up, log in and start a new meeting.
- Enable Zoom's Original Sound for Musicians option in the settings.
- Choose the option to record each participant’s audio separately.
- Invite your podcast guests by copying the meeting link and sending it to them via email or chat.
- Once everyone is in the meeting, click the Record button to start recording. When you’re done, hit Stop, and your podcast will be saved as an mp4 file.
Discord
Many podcasters use Discord despite its limitations for recording. Still, because it’s so popular, we should cover it. To use Discord for your podcast, you’ll need to create a dedicated community space called a server. Here’s how to do it:
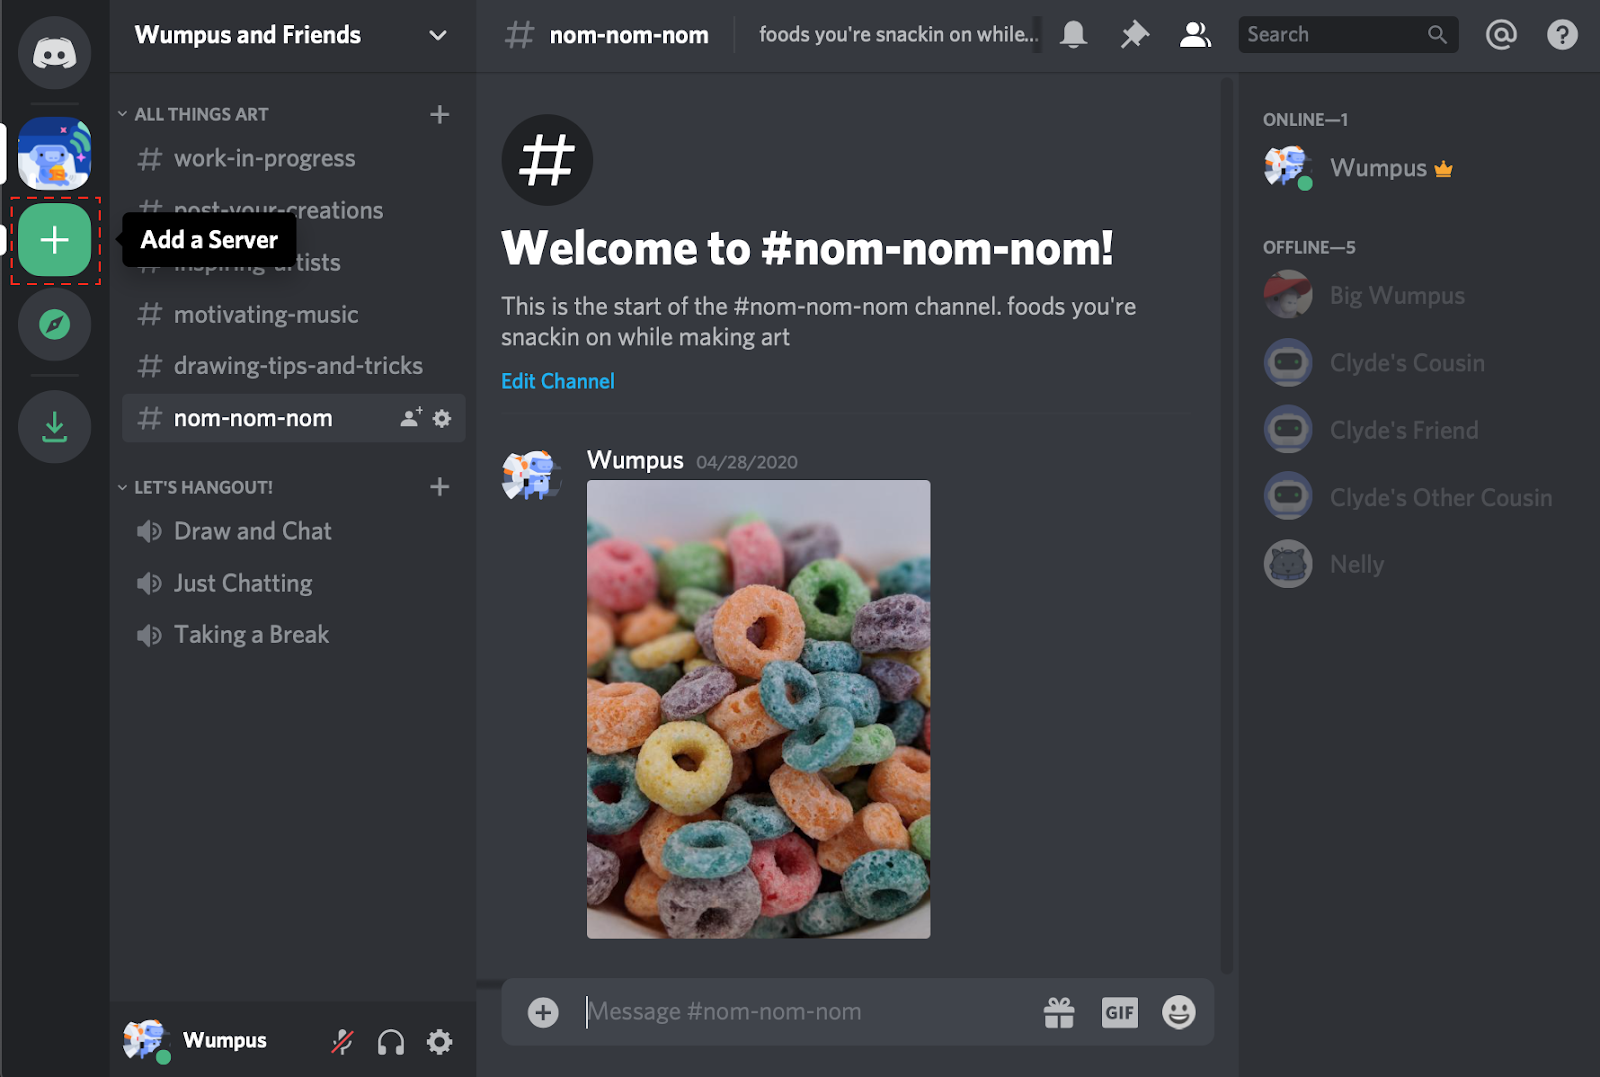
- Sign up for Discord and download the desktop app.
- Inside the app, click the green ‘+’ icon to add a server. Name your server, choose the community option, upload an icon, and hit create.
- Populate your server by adding your podcast team and inviting your audience using the instant invite feature.
Then, you can add a bot like Craig to handle virtual podcast recording for you:
- Verify your account and invite the Craig bot to join. This bot specializes in recording voice channels and supports multitrack recording.
- Once the bot is in your server, use specific commands to start and stop recording sessions as needed.
Skype and Google Hangout are alternatives if you’re looking for more options.
Local vs. Cloud Recording
Local recording means saving files directly onto your device, like a computer or recorder. It offers immediate access without relying on the internet. You manage, edit, and share files at your convenience, which eliminates the risk of data loss due to internet issues. It’s ideal for situations where a stable connection isn’t guaranteed and where privacy and security are important.
As for remote podcast recording in the cloud, it offers accessibility from any device with internet access. However, you don’t get as much reliability and control over your data.
It’s better to choose software that allows you to record locally because you don’t want to risk losing your podcasts if your network connection fails halfway through a recording session.
Multi-Channel vs. Single Channel
When recording a podcast, you have two options: multi-channel (stereo) or single-channel (mono). Many podcasters prefer multi-channel recording because it provides better audio quality and more flexibility in editing.
Multi-channel recording captures audio in two separate channels (left and right). It’s great for podcasts with music, sound effects, or multiple speakers. Plus, it allows for precise adjustments during editing.
On the other hand, single-channel recording blends all sound sources into one track. While simpler, it lacks some of the depth and clarity of multi-channel recording. However, it can still work well for dialogue-heavy podcasts.
Optimizing Your Podcast With Double-Enders
In podcasting, a double-ender refers to a method where each participant records their audio locally. This ensures high-quality sound even when participants are in different locations. Here’s how it works:
- Each person involved records their audio using their equipment.
- They hit record on their software and start the conversation, which creates a sync clap at the beginning for alignment.
- After recording, each participant sends their audio file to the editor.
- The editor aligns and combines the audio tracks in editing software.
Double-enders give producers more control over the final product and allow adjustments for volume, noise removal, and editing. That’s another compelling reason for local recording.
How to Record a Podcast Remotely on Your Phone
When it comes to phone podcasting, you have two options: the straightforward Voice Memo method or the more intricate but higher-quality mixer route.
For the first option, ask your guest to use their smartphone’s Voice Memo app to record themselves. While you’re connected on a video conferencing platform, guide them to open the app, hit record, and hold the phone like a microphone. Once they’re done, they can email you the recording. And just to be safe, you can also record the conversation on the conferencing platform. Just remind your guest to wear headphones during the call to avoid picking up any extra noise.
As for the mixer option, it’s not surprising that many podcasters lack a mixer at home. However, having one makes it easier to include phone calls and other audio sources in your recording setup. The RODECaster Pro is a mixer specifically designed for podcasters and works well for home studio setups.
A mixer lets you input audio directly and cuts down on using multiple programs or editing later. For instance, instead of Skype for calls, connect your phone to the mixer, and record the call’s audio straight into your editing software.
To connect your mixer to your phone using a USB cable:
- Plug the camera adapter into your phone. For iPhones, use a Lightning Camera Adapter, and for Android phones, use a USBC Camera Adapter.
- Connect the audio mixer to the camera adapter using a USB cable (USB-B to USB-A).
- Adjust the output volume on your audio mixer as necessary.
Then, simply use the instructions on how to record a podcast with two hosts remotely, whether you prefer a desktop or online recording platform.
While the ideal scenario would involve having mixers in every recording location, that’s often not feasible. So, this setup will suffice for most people.
Tips for Flawless Podcast Recordings
Warm-up routine
Take a few moments to warm up before you start recording. Your mouth, throat, and vocal cords perform better when they’re warm. Practice your script and stretch your face to prevent mispronunciations and repetitions.
Test recording
Before diving into your podcast, make a test recording to ensure there are no issues with your setup. A brief one-minute recording where you speak into the microphone is sufficient. Listen for any unwanted background noise or technical problems.
Minimal interruptions
While your guests speak, refrain from interjecting with phrases like yes or okay. These can distract listeners and require additional editing. Practice controlling your urge to interject and give your guest or co-host space to finish their thoughts without interruptions.
Mute when silent
When you’re not speaking, mute your microphone to prevent picking up unwanted noise. This reduces the editing workload and ensures a cleaner final product.
Stillness
Keep your body still during recording to reduce background noise. When you’re using earbud headphones, make sure not to move in a way that causes the microphone to brush against your clothing, like your shirt or collar. Also, stay seated with your feet planted and minimize desk movements and paper shuffling.
Bonus: How to Edit a Virtual Podcast
Why stop on how to record a podcast remotely? Let’s edit and mix, too!
The easier way is to use built-in tools on platforms like Waveroom and Riverside. When editing, keep the focus on the story you want to convey. Trim out irrelevant content and prioritize elements that contribute to the narrative.
For example, if you’re discussing music production with a guest, focus on topics like their creative process, notable collaborations, and career milestones. Cut out anything unrelated or distracting, like off-topic stories or complicated language, to keep the conversation smooth.
Some tasks, like noise removal, can be automated with AI, but others require your input. For example, you’ll need to manually remove unnecessary words, pauses, and distractions like “you know”.
Next, have your tracks organized properly before mixing and arrange them in the order of host audio, guest audio, room tone, and music. For advanced users, enhance your podcast’s sound with equalization during mixing. EQ helps fix any tonal issues before using compression to prevent accentuating them.
Final Thoughts
Remote podcast interviewing has made podcasting easier and more accessible than ever before. While DIY methods exist, they often require extensive editing. For most podcasters, hosts, and guests alike, the best solution is dedicated remote recording platforms like Waveroom, Riverside, Zencastr, Cleanfeed, and Squadcast.
Don’t hesitate to embrace this trend!
FAQ
Can I record a podcast with people in different places?
Yes! If you have a good remote recording platform, it’s easy to achieve high-quality podcast interviews regardless of your guests’ locations. You can record through a specialized program, general conferencing software, or even a simple phone call.
How can I record a podcast with minimal background noise?
The best you can do is to get close to the mic, use pop filters, secure the mic stand, opt for dynamic mics, and record in a quiet room. Any remaining noise can be edited out with AI.
Which remote recording option provides the highest audio quality?
For the best remote recordings, invest in high-quality microphones and use specialized recording software. Also, go for individual track recording and double-enders and try to master proficient mixing techniques to enhance the overall audio quality.


